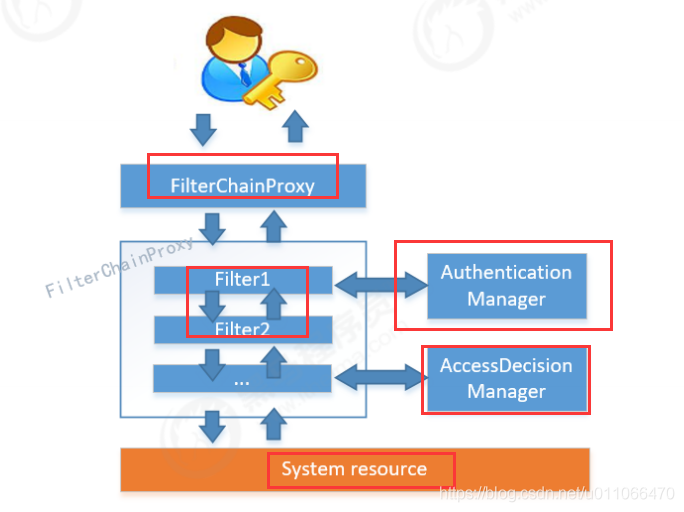
Spring Security对Web资源的保护是靠Filter实现的,当初始化Spring Security时,会创建一个名为SpringSecurityFilterChain的Servlet过滤器,类型为org.springframework.security.web.FilterChainProxy,它实现了javax.servlet.Filter,因此外部的请求会经过此 类。如下图所示:
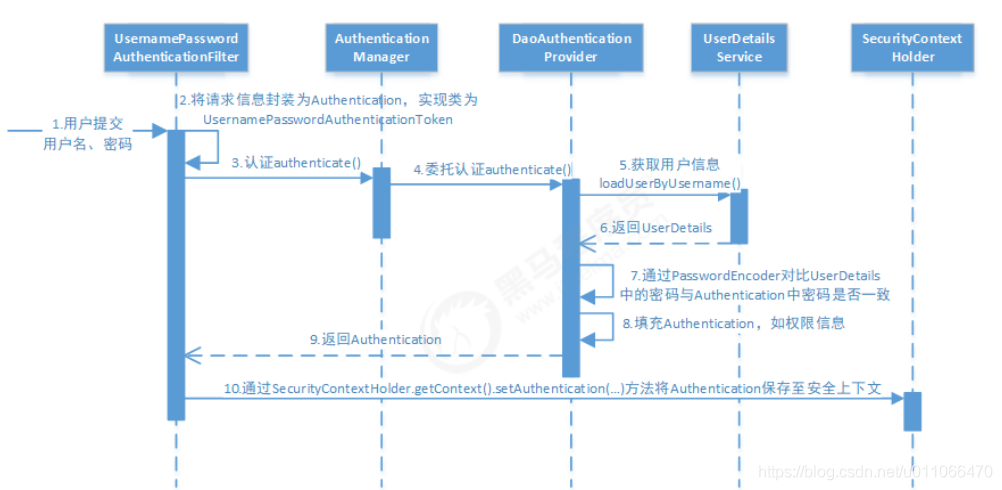
1. 用户提交用户名、密码被SecurityFilterChain中的 UsernamePasswordAuthenticationFilter 过滤器获取到, 封装为请求Authentication,通常情况下是UsernamePasswordAuthenticationToken这个实现类。
2. 然后过滤器将Authentication提交至认证管理器(AuthenticationManager)进行认证
3. 认证成功后, AuthenticationManager 身份管理器返回一个被填充满了信息的(包括上面提到的权限信息, 身份信息,细节信息,但密码通常会被移除) Authentication 实例。
4. SecurityContextHolder 安全上下文容器将第3步填充了信息的 Authentication ,通过
SecurityContextHolder.getContext().setAuthentication(…)方法,设置到其中。
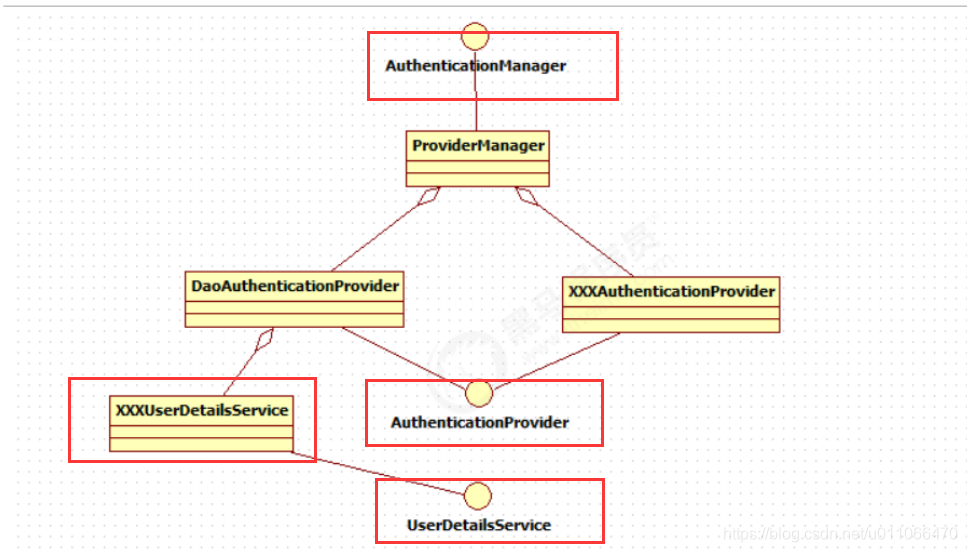
可以看出AuthenticationManager接口(认证管理器)是认证相关的核心接口,也是发起认证的出发点,它 的实现类为ProviderManager。而Spring Security支持多种认证方式,因此ProviderManager维护着一个 List<AuthenticationProvider> 列表,存放多种认证方式,最终实际的认证工作是由 AuthenticationProvider完成的。
咱们知道web表单的对应的AuthenticationProvider实现类为DaoAuthenticationProvider,它的内部又维护着一个UserDetailsService负责UserDetails的获取。最终 AuthenticationProvider将UserDetails填充至Authentication。
1.认证管理器(AuthenticationManager)委托 AuthenticationProvider完成认证工作AuthenticationProvider是一个接口,如下图

在上图中authenticate()方法定义了认证的实现过程,它的参数是一个Authentication,里面包含了登录用户所提交的用户、密码等。而返回值也是一Authentication,这个Authentication则是在认证成功后,将用户的权限及其他信息重新组装后生成。
2.Spring Security中维护着一个List<AuthenticationProvider>列表,存放多种认证方式,不同的认证方式使用不 同的AuthenticationProvider。每个AuthenticationProvider需要实现supports()方法来表明自己支持的认证方式,

3.Authentication(认证信息)的结构,它是一个接口,我们之前提到的
UsernamePasswordAuthenticationToken就是它的实现之一:
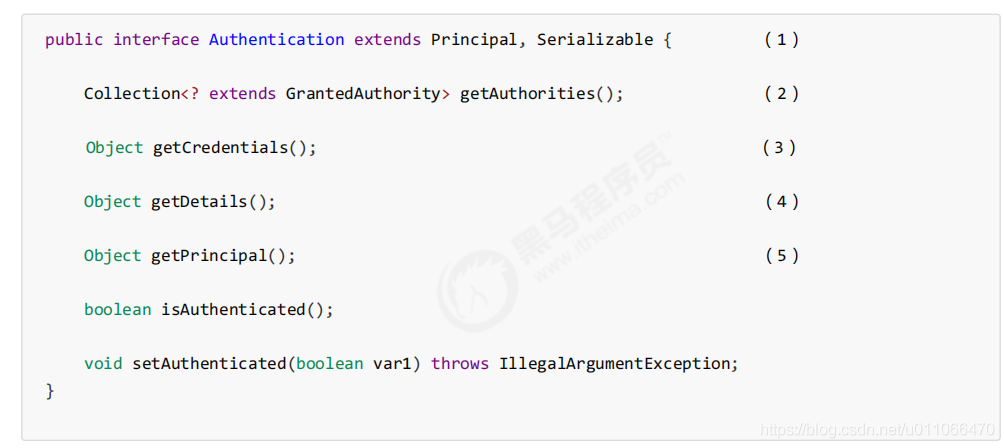
(1)Authentication是spring security包中的接口,直接继承自Principal类,而Principal是位于java.security 包中的。它是表示着一个抽象主体身份,任何主体都有一个名称,因此包含一个getName()方法。
(2)getAuthorities(),权限信息列表,默认是GrantedAuthority接口的一些实现类,通常是代表权限信息的一系 列字符串。
(3)getCredentials(),凭证信息,用户输入的密码字符串,在认证过后通常会被移除,用于保障安全。
(4)getDetails(),细节信息,web应用中的实现接口通常为WebAuthenticationDetails,它记录了访问者的ip地址和sessionId的值。
(5)getPrincipal(),身份信息,大部分情况下返回的是UserDetails接口的实现类,UserDetails代表用户的详细 信息,那从Authentication中取出来的UserDetails就是当前登录用户信息,它也是框架中的常用接口之一。
DaoAuthenticationProvider处理了web表单的认证逻辑,认证成功后既得到一个
Authentication(UsernamePasswordAuthenticationToken实现),里面包含了身份信息(Principal)。这个身份信息就是一个Object,大多数情况下它可以被强转为UserDetails对象。
DaoAuthenticationProvider中包含了一个UserDetailsService实例,它负责根据用户名提取用户信息UserDetails(包含密码),而后DaoAuthenticationProvider会去对比UserDetailsService提取的用户密码与用户提交的密码是否匹配作为认证成功的关键依据,因此可以通过将自定义的UserDetailsService公开为spring bean来定义自定义身份验证。
DaoAuthenticationProvider和UserDetailsService的职责搞混淆,其实UserDetailsService只负责从特定的地方(通常是数据库)加载用户信息,仅此而已。而DaoAuthenticationProvider的职责更大,它完成完整的认证流程,同时会把UserDetails填充至Authentication。
UserDetails是用户信息:
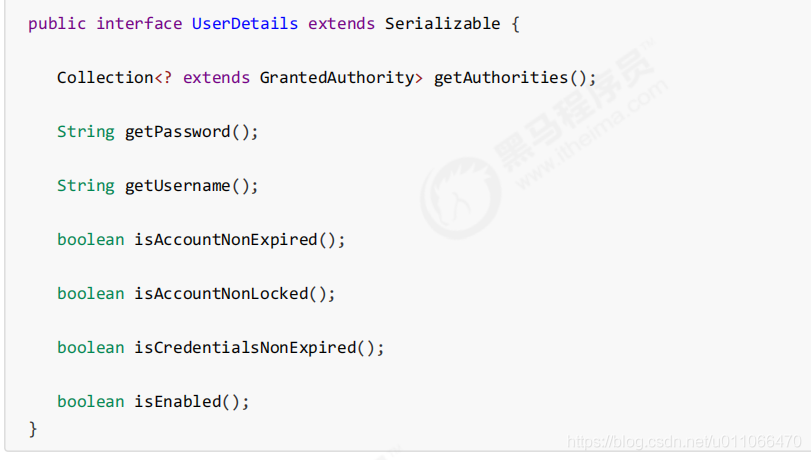
通过实现UserDetailsService和UserDetails,我们可以完成对用户信息获取方式以及用户信息字段的扩展。
DaoAuthenticationProvider认证处理器通过UserDetailsService获取到UserDetails后,DaoAuthenticationProvider通过PasswordEncoder接口的matches方法进行密码的对比,而具体的密码对比细节取决于实现:
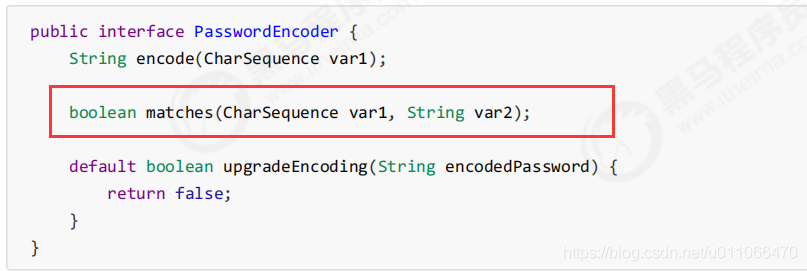
1.Spring Security提供很多内置的PasswordEncoder,能够开箱即用,使用某种PasswordEncoder只需要进行如 下声明即可,如下

实际项目中推荐使用BCryptPasswordEncoder,Pbkdf2PasswordEncoder,SCryptPasswordEncoder等,感兴趣 的大家可以看看这些PasswordEncoder的具体实现。

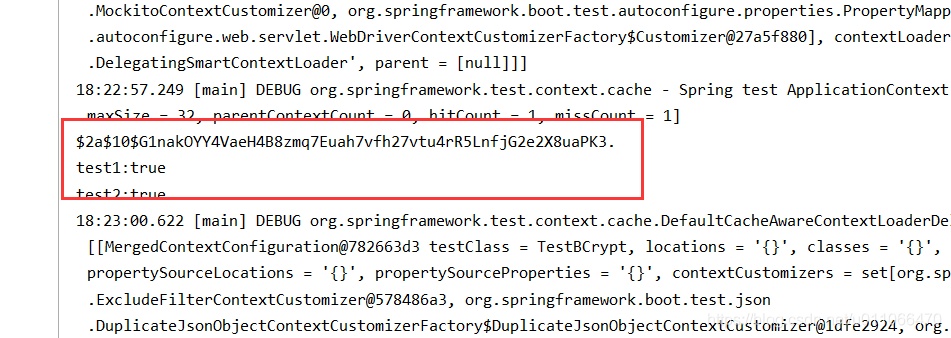
2.编写一个test类
package com.ljf.spt.security; import org.junit.Test; import org.junit.runner.RunWith; import org.springframework.security.crypto.bcrypt.BCrypt; import org.springframework.test.context.junit4.SpringRunner; /** * @author Administrator * @version 1.0 **/ @RunWith(SpringRunner.class) public class TestBCrypt { @Test public void testBCrypt(){ //对密码进行加密 String hashpw = BCrypt.hashpw("456", BCrypt.gensalt()); System.out.println(hashpw); //校验密码 boolean checkpw = BCrypt.checkpw("123", "$2a$10$aFsOFzujtPCnUCUKcozsHux0rQ/3faAHGFSVb9Y.B1ntpmEhjRtru"); boolean checkpw2 = BCrypt.checkpw("123", "$2a$10$HuClcUqr/FSLmzSsp9SHqe7D51Keu1sAL7tUAAcb..FyILiLdFKYy"); System.out.println("test1:"+checkpw); System.out.println("test2:"+checkpw2); } }执行结果:
流程如下:
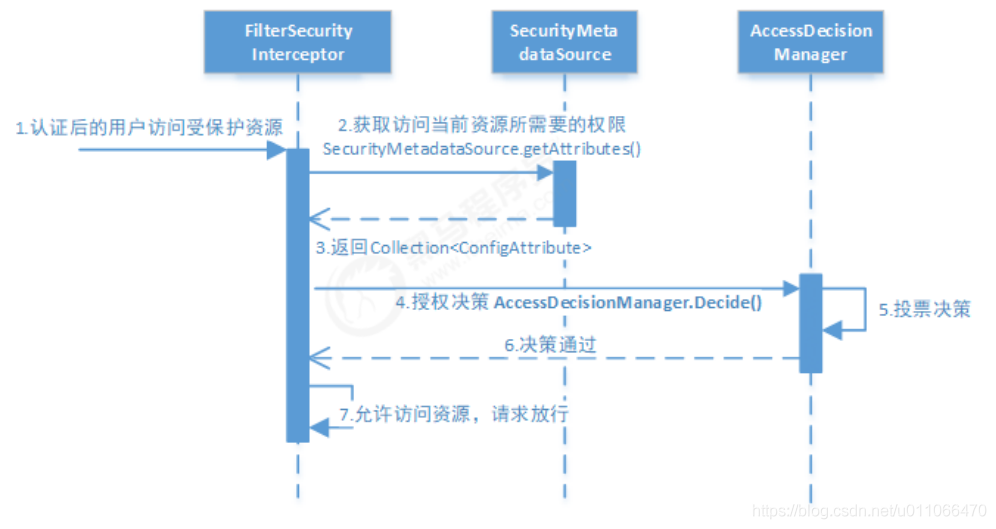
3.最后,FilterSecurityInterceptor会调用 AccessDecisionManager 进行授权决策,若决策通过,则允许访问资 源,否则将禁止访问。

decide接口就是用来鉴定当前用户是否有访问对应受保护资源的权限。
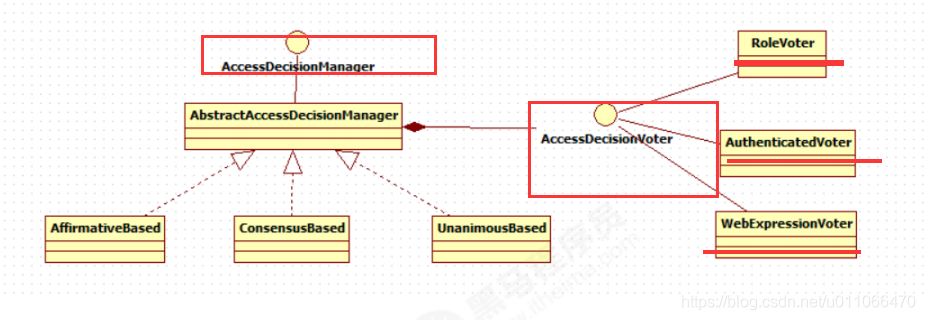

vote()方法的返回结果会是AccessDecisionVoter中定义的三个常量之一。
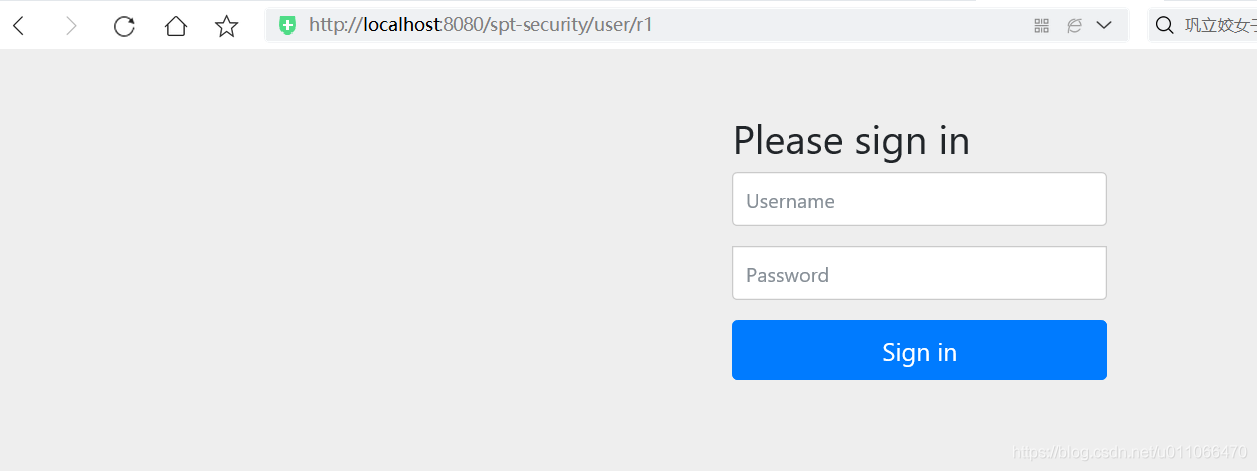
spring security内嵌了自己的登录页面
<?xml version="1.0" encoding="UTF-8"?> <project xmlns="http://maven.apache.org/POM/4.0.0" xmlns:xsi="http://www.w3.org/2001/XMLSchema-instance" xsi:schemaLocation="http://maven.apache.org/POM/4.0.0 http://maven.apache.org/xsd/maven-4.0.0.xsd"> <modelVersion>4.0.0</modelVersion> <groupId>com.ljf.spt.security</groupId> <artifactId>spt-security-demo</artifactId> <version>1.0-SNAPSHOT</version> <!-- springboot-parent --> <parent> <groupId>org.springframework.boot</groupId> <artifactId>spring-boot-starter-parent</artifactId> <version>2.1.3.RELEASE</version> </parent> <name>spt-security-demo</name> <!-- FIXME change it to the project's website --> <url>http://www.example.com</url> <properties> <project.build.sourceEncoding>UTF-8</project.build.sourceEncoding> <maven.compiler.source>1.8</maven.compiler.source> <maven.compiler.target>1.8</maven.compiler.target> </properties> <dependencies> <dependency> <groupId>junit</groupId> <artifactId>junit</artifactId> <version>4.13</version> <scope>test</scope> </dependency> <!-- 以下是>spring boot依赖--> <dependency> <groupId>org.springframework.boot</groupId> <artifactId>spring-boot-starter-web</artifactId> </dependency> <!-- 以下是>spring security依赖--> <dependency> <groupId>org.springframework.boot</groupId> <artifactId>spring-boot-starter-security</artifactId> </dependency> <!-- 以下是jsp依赖--> <dependency> <groupId>javax.servlet</groupId> <artifactId>javax.servlet-api</artifactId> <scope>provided</scope> </dependency> <!--jsp页面使用jstl标签 --> <dependency> <groupId>javax.servlet</groupId> <artifactId>jstl</artifactId> <version>1.2</version> <scope>provided</scope> </dependency> <dependency> <groupId>org.springframework.boot</groupId> <artifactId>spring-boot-starter-tomcat</artifactId> <scope>provided</scope> </dependency> <!--用于编译jsp --> <dependency> <groupId>org.apache.tomcat.embed</groupId> <artifactId>tomcat-embed-jasper</artifactId> <version>9.0.39</version> </dependency> <dependency> <groupId>org.projectlombok</groupId> <artifactId>lombok</artifactId> <version>1.18.0</version> </dependency> <dependency> <groupId>org.springframework.boot</groupId> <artifactId>spring-boot-starter-test</artifactId> <scope>test</scope> </dependency> <dependency> <groupId>org.springframework.boot</groupId> <artifactId>spring-boot-starter-jdbc</artifactId> </dependency> <dependency> <groupId>mysql</groupId> <artifactId>mysql-connector-java</artifactId> <version>5.1.47</version> </dependency> </dependencies> <build> <plugins> <plugin> <groupId>org.apache.tomcat.maven</groupId> <artifactId>tomcat7-maven-plugin</artifactId> <version>2.2</version> </plugin> <plugin> <groupId>org.apache.maven.plugins</groupId> <artifactId>maven-compiler-plugin</artifactId> <configuration> <source>1.8</source> <target>1.8</target> </configuration> </plugin> <plugin> <artifactId>maven-resources-plugin</artifactId> <configuration> <encoding>utf-8</encoding> <useDefaultDelimiters>true</useDefaultDelimiters> <resources> <resource> <directory>src/main/resources</directory> <filtering>true</filtering> <includes> <include>**/*</include> </includes> </resource> <resource> <directory>src/main/java</directory> <includes> <include>**/*.xml</include> </includes> </resource> </resources> </configuration> </plugin> </plugins> </build> </project>在resources下添加application.properties,内容如下:
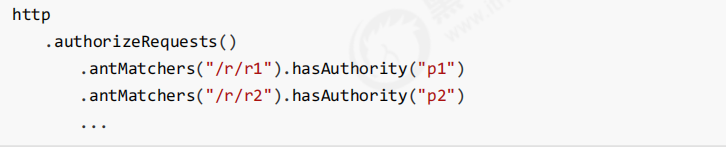
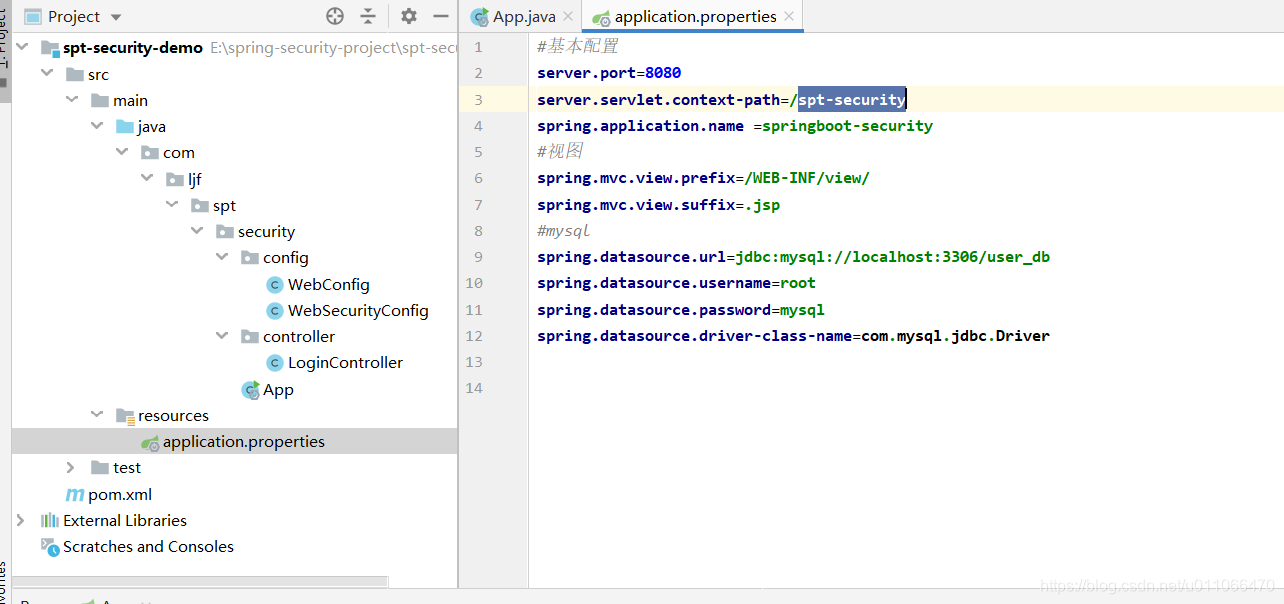
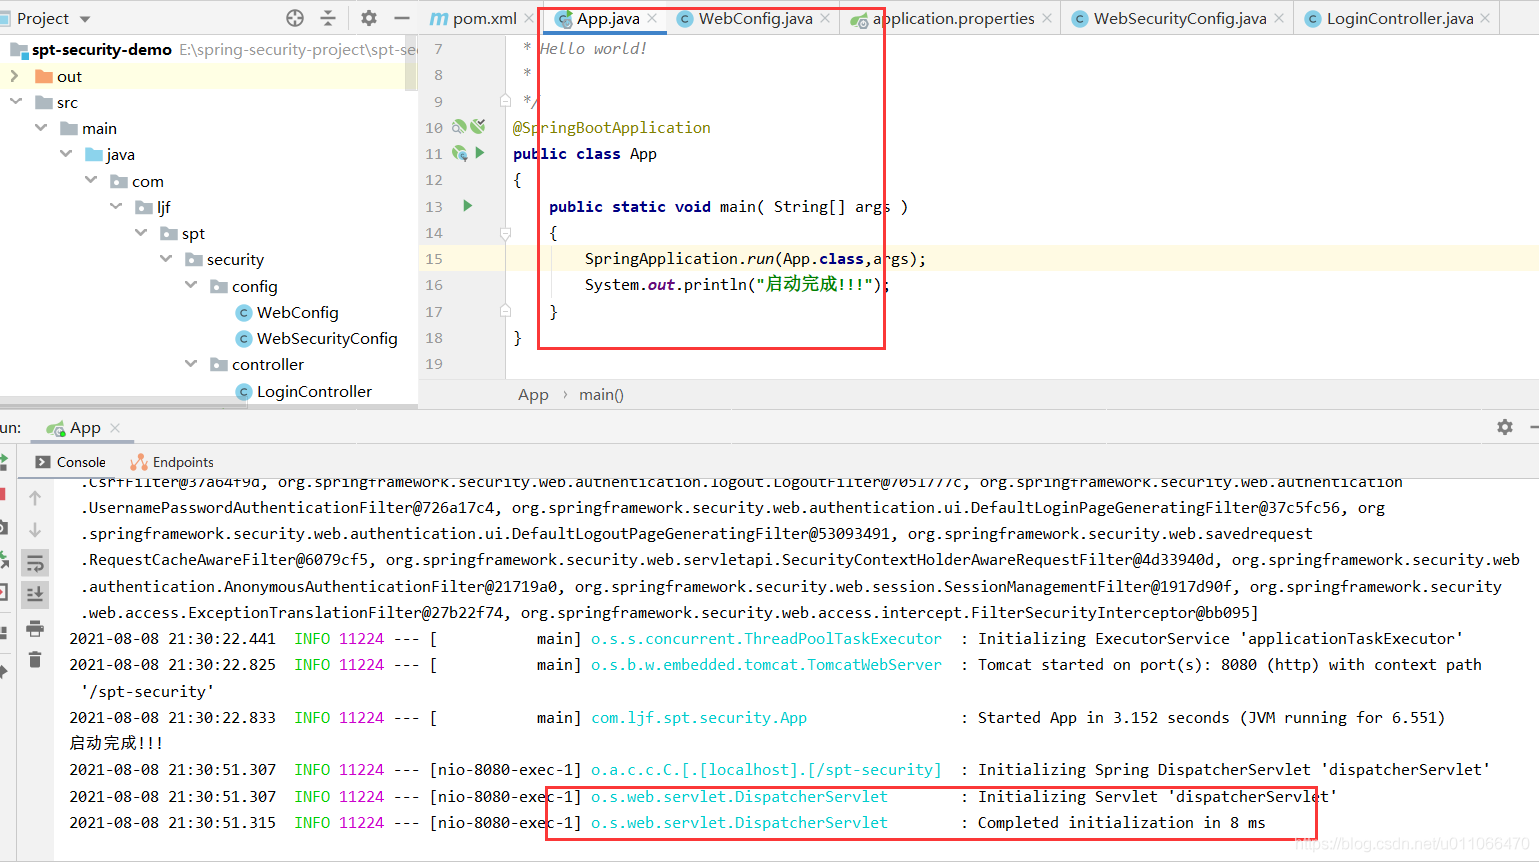
#基本配置 server.port=8080 server.servlet.context-path=/spt-security spring.application.name =springboot-security #视图 spring.mvc.view.prefix=/WEB-INF/view/ spring.mvc.view.suffix=.jsp #mysql spring.datasource.url=jdbc:mysql://localhost:3306/user_db spring.datasource.username=root spring.datasource.password=mysql spring.datasource.driver-class-name=com.mysql.jdbc.Driver@SpringBootApplication public class App { public static void main( String[] args ) { SpringApplication.run(App.class,args); System.out.println("启动完成!!!"); } }@Configuration//就相当于springmvc.xml文件 public class WebConfig implements WebMvcConfigurer { @Override public void addViewControllers(ViewControllerRegistry registry) { registry.addViewController("/").setViewName("login"); } }package com.ljf.spt.security.config; import org.springframework.context.annotation.Bean; import org.springframework.security.config.annotation.web.builders.HttpSecurity; import org.springframework.security.config.annotation.web.configuration.EnableWebSecurity; import org.springframework.security.config.annotation.web.configuration.WebSecurityConfigurerAdapter; import org.springframework.security.core.userdetails.User; import org.springframework.security.core.userdetails.UserDetailsService; import org.springframework.security.crypto.password.NoOpPasswordEncoder; import org.springframework.security.crypto.password.PasswordEncoder; import org.springframework.security.provisioning.InMemoryUserDetailsManager; /** * @author Administrator * @version 1.0 **/ //@EnableWebSecurity @Configuration public class WebSecurityConfig extends WebSecurityConfigurerAdapter { //1.定义用户信息服务(查询用户信息) @Bean public UserDetailsService userDetailsService(){ InMemoryUserDetailsManager manager = new InMemoryUserDetailsManager(); manager.createUser(User.withUsername("zhangsan").password("123").authorities("p1").build()); manager.createUser(User.withUsername("lisi").password("456").authorities("p2").build()); return manager; } //2.密码编码器 @Bean public PasswordEncoder passwordEncoder(){ return NoOpPasswordEncoder.getInstance(); } //3.安全拦截机制(最重要) @Override protected void configure(HttpSecurity http) throws Exception { http.authorizeRequests() .antMatchers("/user/r1").hasAuthority("p1") //p1角色具有访问/user/r1读取权限 .antMatchers("/user/r2").hasAuthority("p2") //p2角色具有访问/user/r2读取权限 .antMatchers("/user/**").authenticated()//所有/user/**的请求必须认证通过 .anyRequest().permitAll()//除了/user/**,其它的请求可以不经过认证,就可以访问 .and() .formLogin()//允许表单登录 .successForwardUrl("/login-success");//自定义登录成功的页面地址,登录成功跳转的地址 } } @RequestMapping(value = "/login-success",produces = {"text/plain;charset=UTF-8"}) public String loginSuccess(){ //提示具体用户名称登录成功 return getUsername()+" 登录成功"; }注意这是springboot启动方式不用在tomcat方式下启动:直接运行springboot的启动入口程序就行,如下图:
如果启动tomcat,则报404
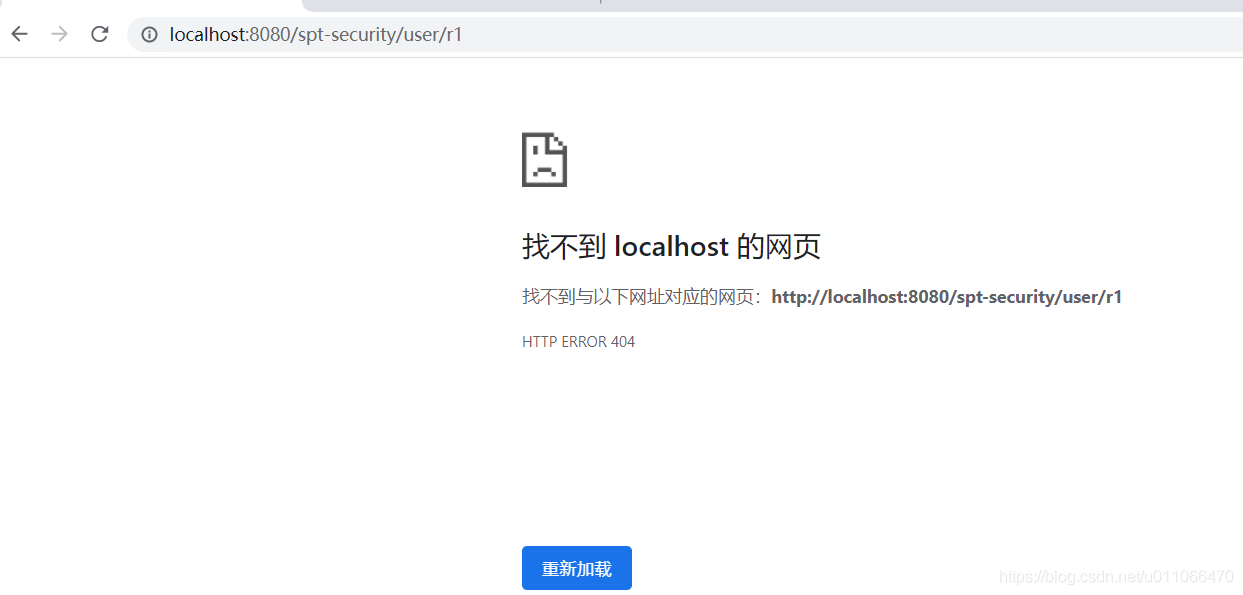
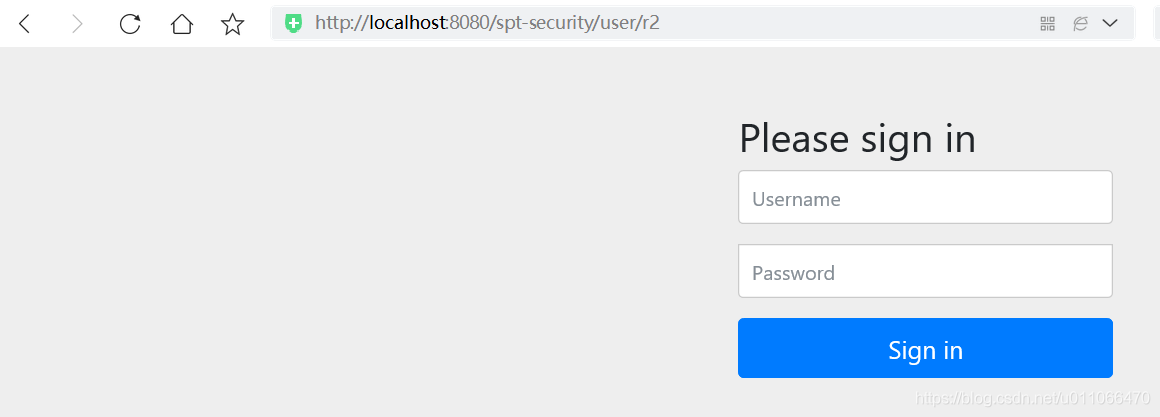
1. 未登录
访问资源r1,跳转到登录页面
访问资源r2,跳转到登录页面
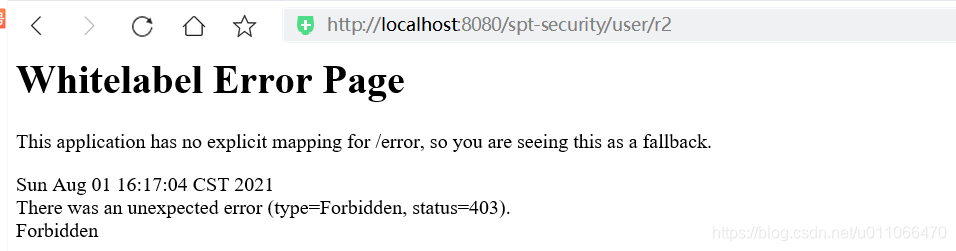
2.登录情况
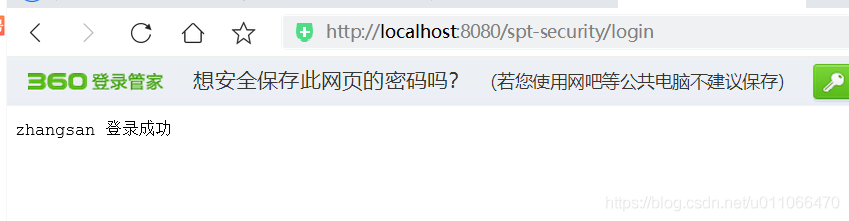
访问资源1:

访问资源2:
总结:
1、未登录成功时,访问/user/r1和/user/r2,均跳转到登录页面,进行认证登录
2、登录成功时,访问/user/r1和/user/r2,有权限时则正常访问,否则返回403(拒绝访问)